


Nano Flip ATmega328P Microcontroller Development Board 2-Pack (Arduino Nano Compatible)
Nano Flip ATmega328P Microcontroller Development Board 2-Pack (Arduino Nano Compatible)
Couldn't load pickup availability
NOTE: For large quantity orders of the Nano Flip with custom pricing please contact us directly.
This product has a datasheet!
This product has a 3D model!
This product has videos here and here!
This product has example sketches!
This product has a Fritzing model!
This product has tutorials:
- Making "The Clapper" Basic Project
- The Nano That Wanted to Be an Uno
- Custom 24-Hour Single Revolution Clock
- Changing Bootloader on a Nano using a Custom Shield
- How to Verify the Clock Source on a Nano
Also available on
- Digikey (180+ countries)
- Jameco (North America)
- RobotShop (180+ countries)
- Amazon (Canada)
- Amazon (USA)
About this item
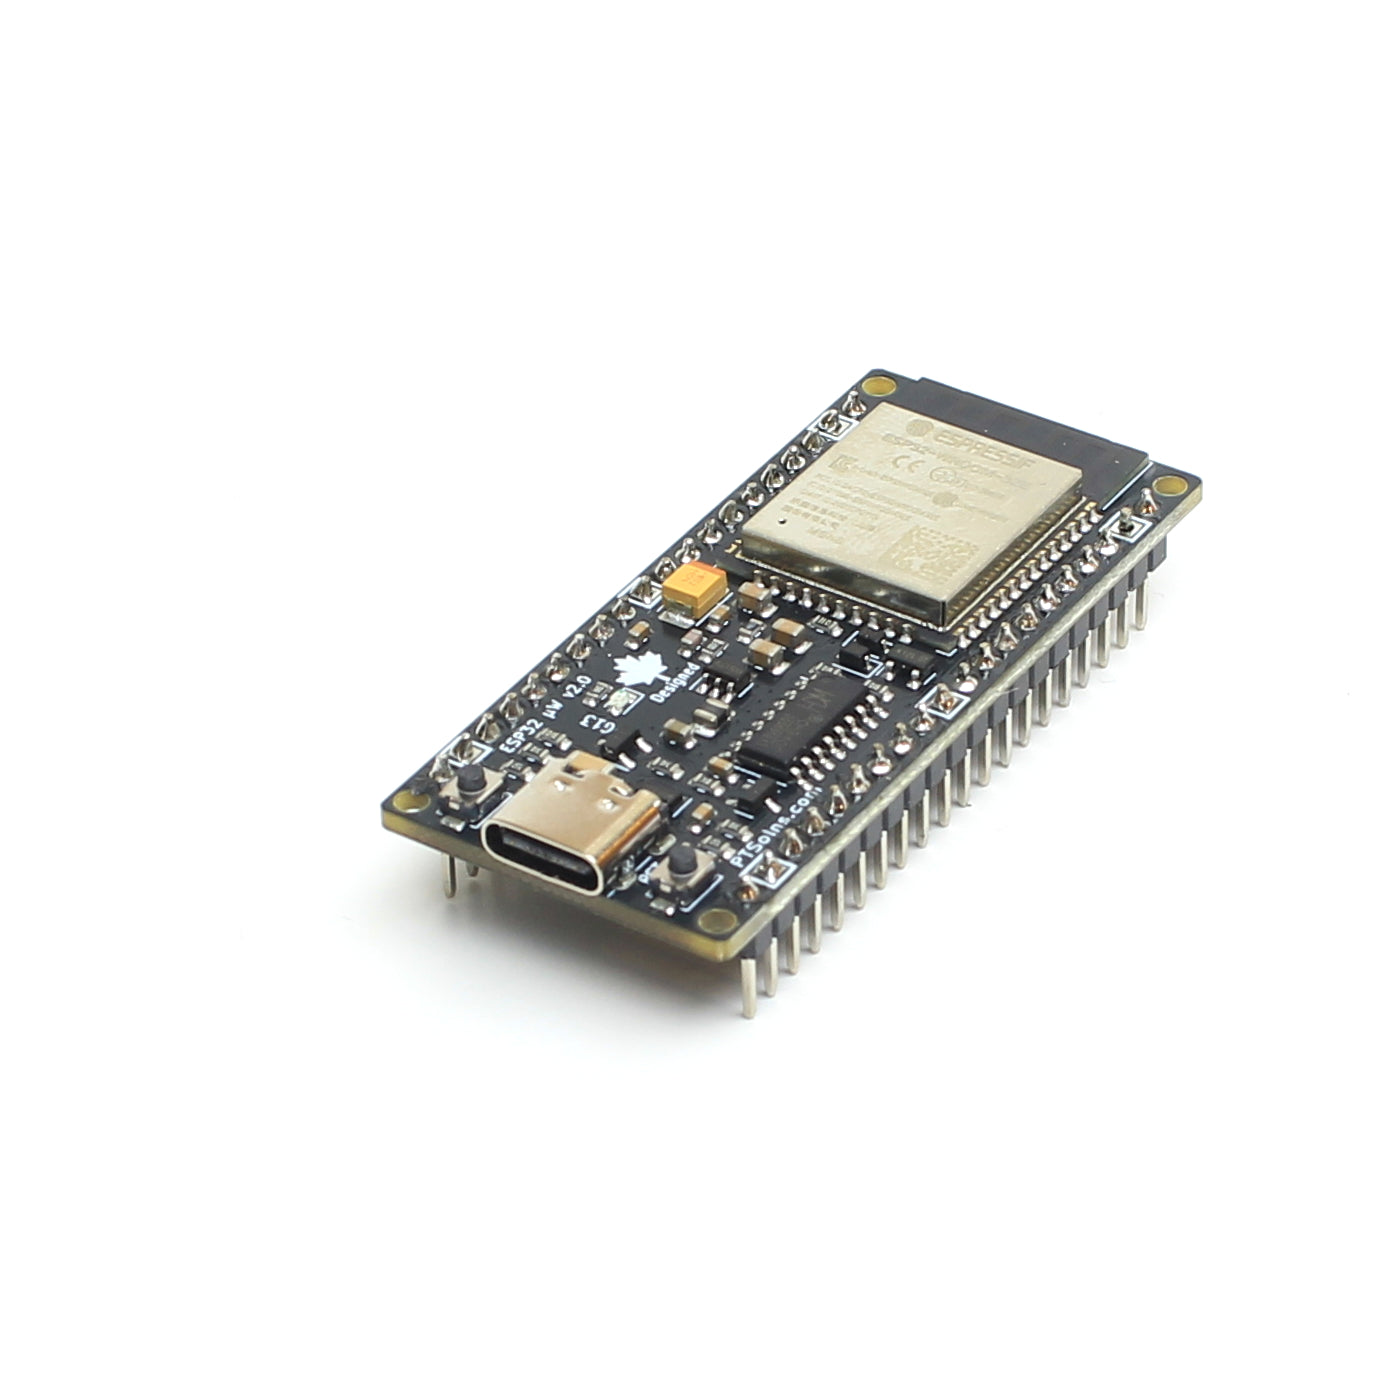
- A Classic, Reimagined: PTSolns Nano Flip microcontroller development board, based on the Microchip ATmega328P and is Arduino Nano compatible, is a modern twist on a classic widely popular board. Designed with a breadboard-friendly form factor and backed by a large Maker community, the Nano Flip is perfect for embedded systems with size constraints. The Nano is ideal for STEM education, hobby and home projects, and rapid prototyping, whether you're driving motors or LEDs, reading sensor data, or interfacing with I2C/SPI buses or RF modules.
- Plug & Play Ready: The Nano Flip microcontroller development board arrives fully assembled with soldered headers, and comes preloaded with the Optiboot bootloader and our custom “GetStarted” sketch, so you can start using it right away—no setup required. Simply power the Nano up and begin experimenting. A description of the sketch is available in the datasheet, available under the “Safety and Product Resources” section of this product page on this product page or on our PTSolns Documentation Repository.
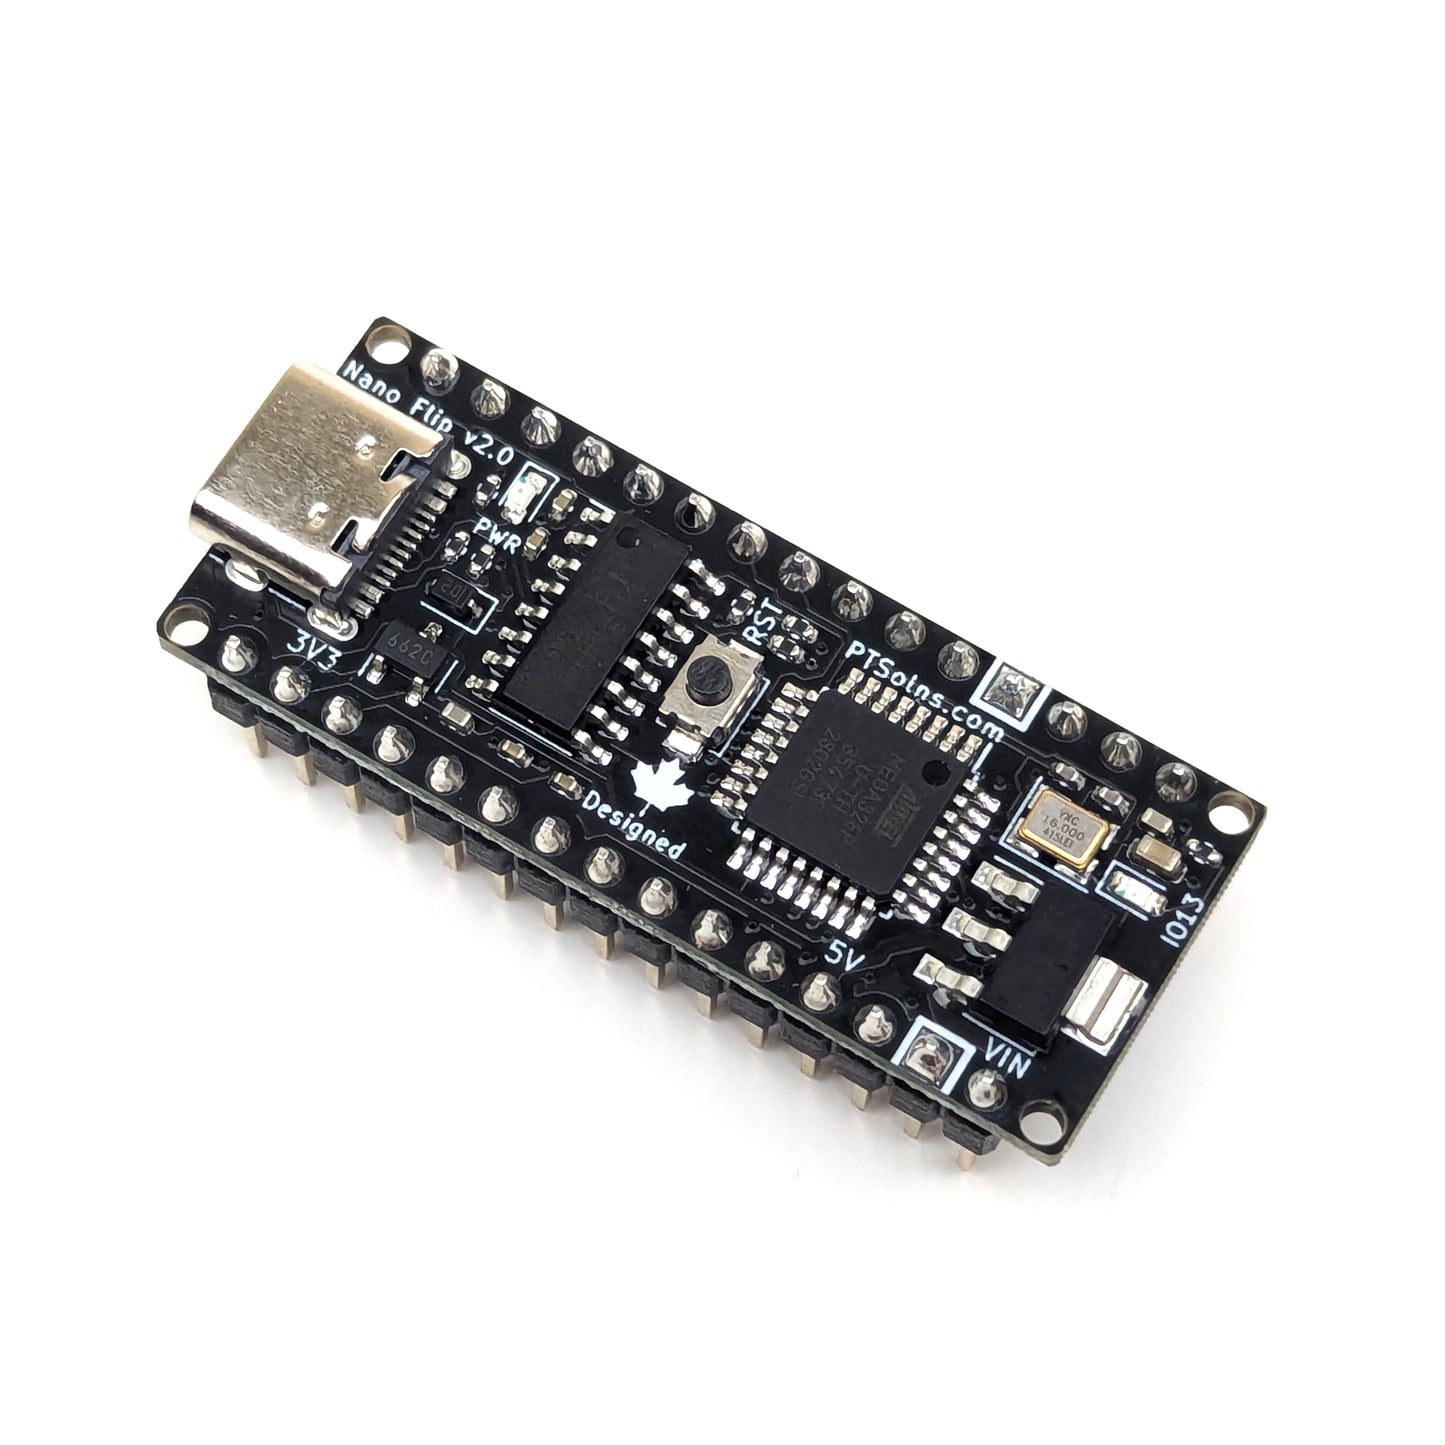
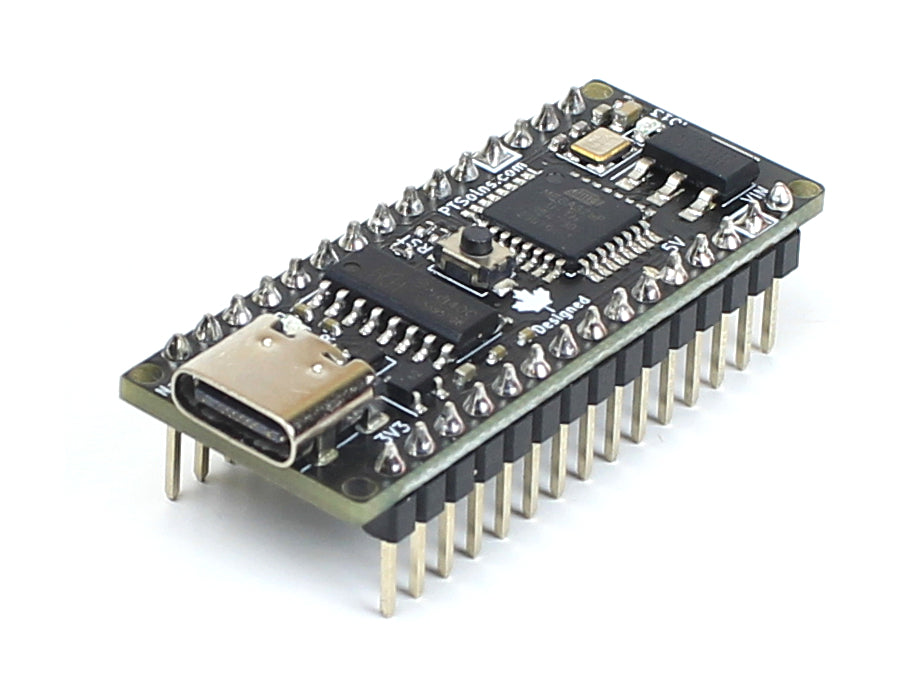
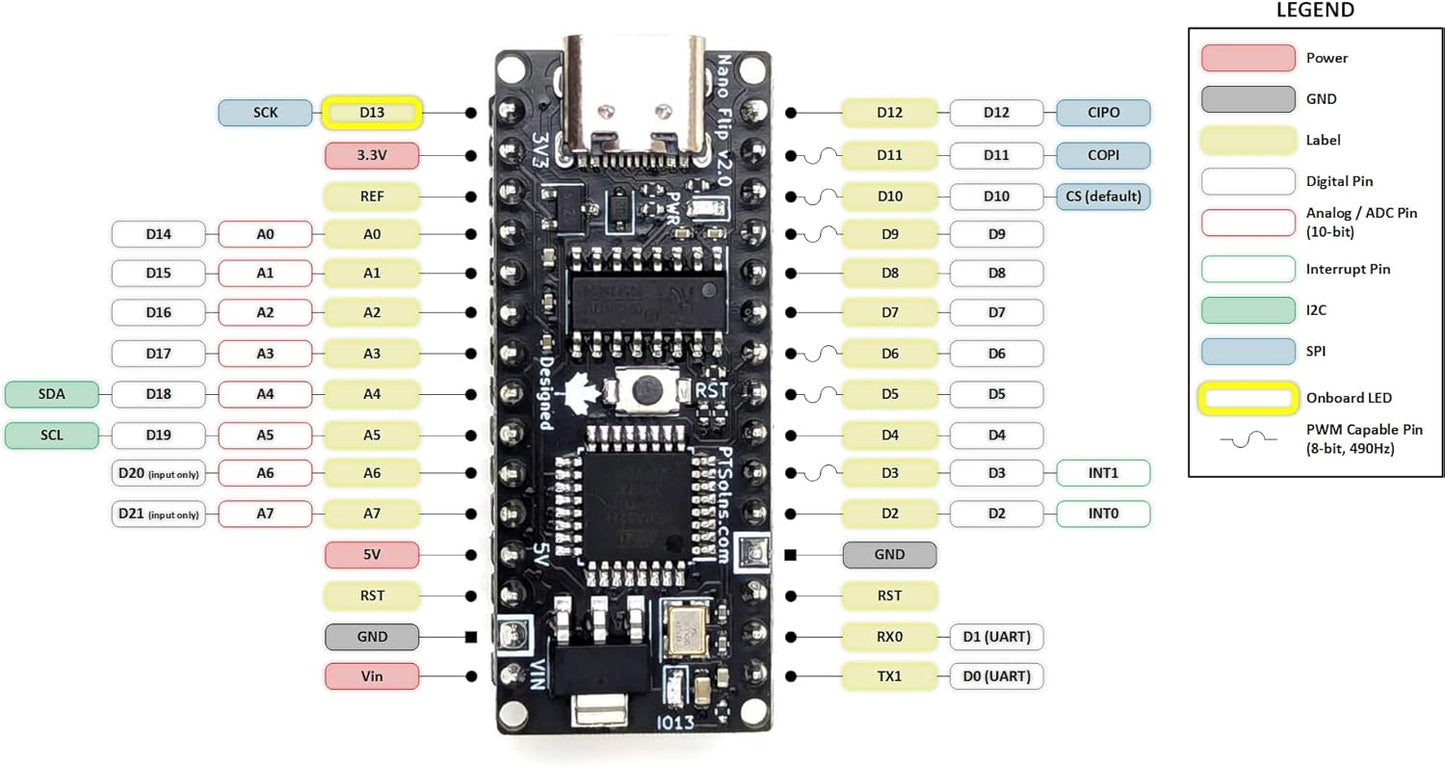
- Packed with Features: The Nano Flip microcontroller features a modern USB-C port, programmable and power LEDs, a reset button, low-profile design, and optional 5V power rail isolation. The Nano includes 14 digital I/O pins (6 with PWM support), 8 analog inputs, and built-in I2C and SPI buses. For a complete list of features, pinout, and electrical ratings, please refer to the datasheet.
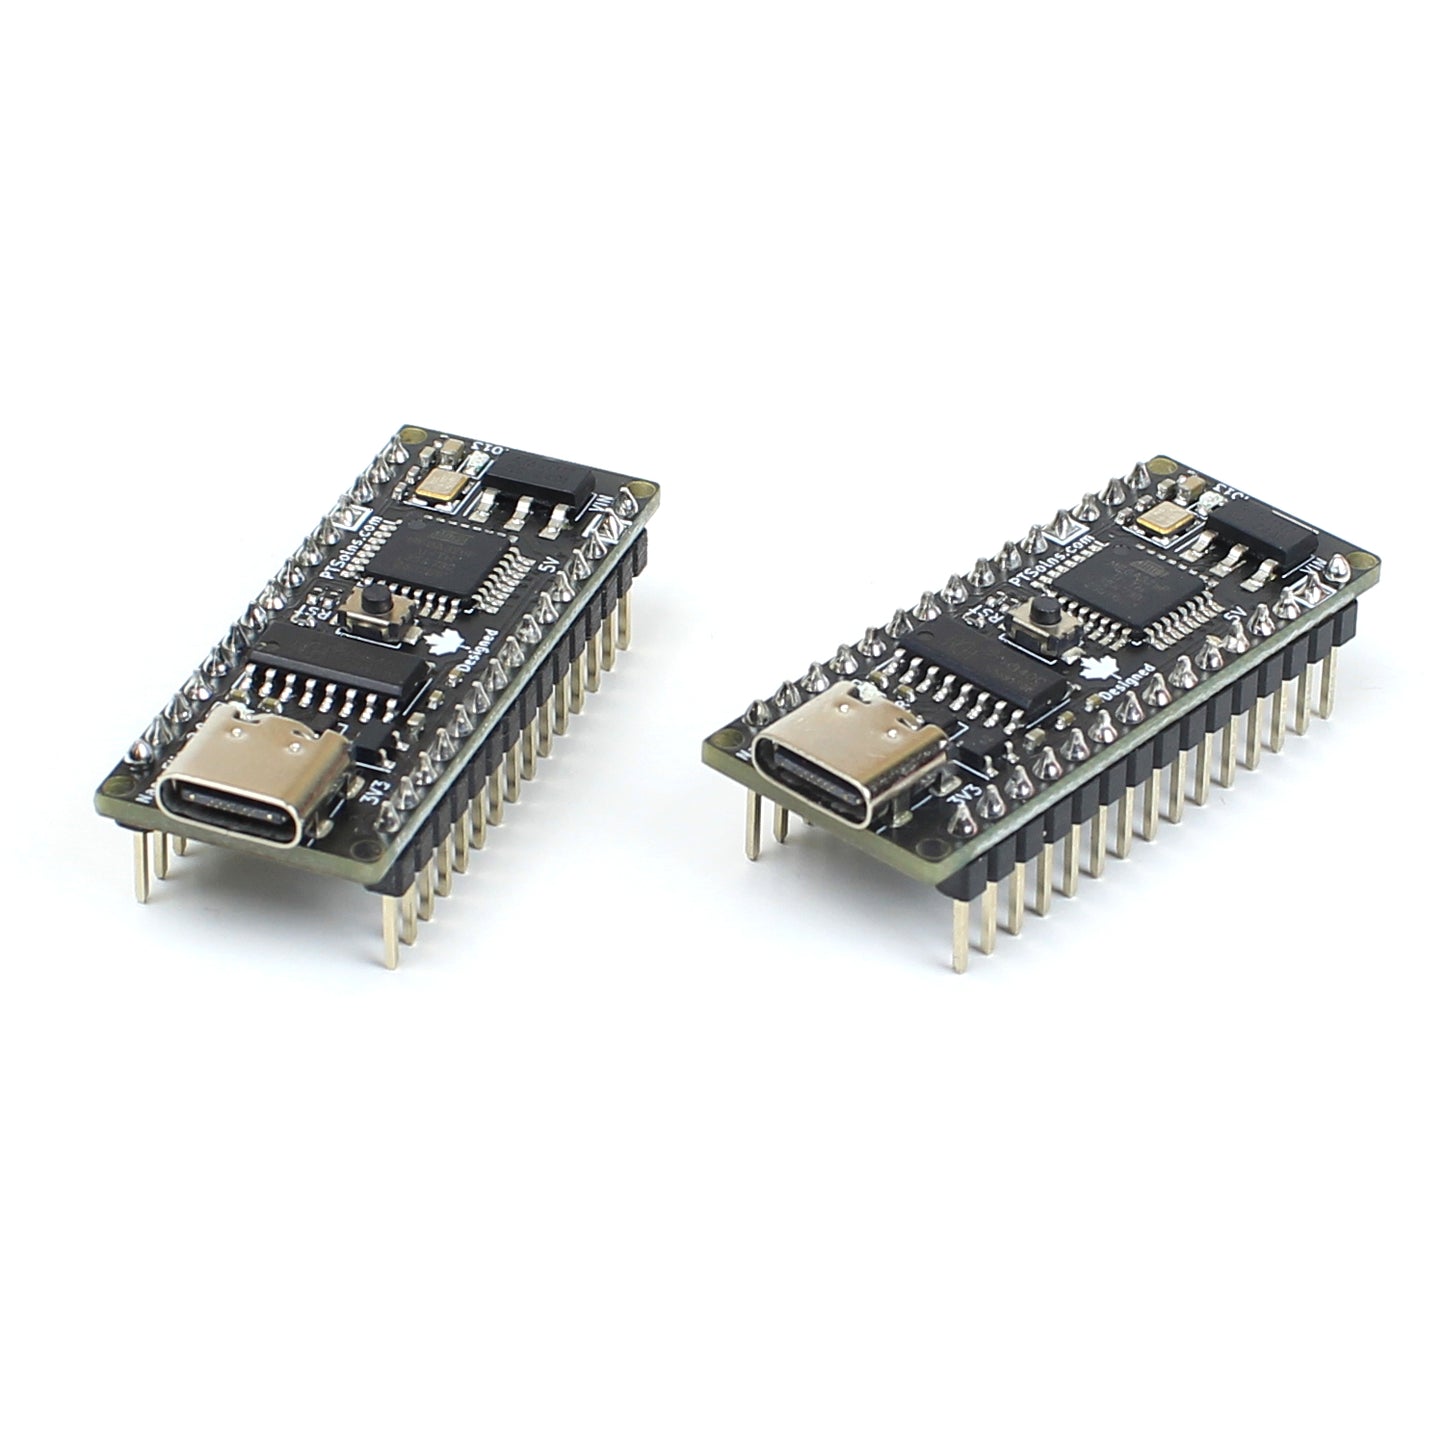
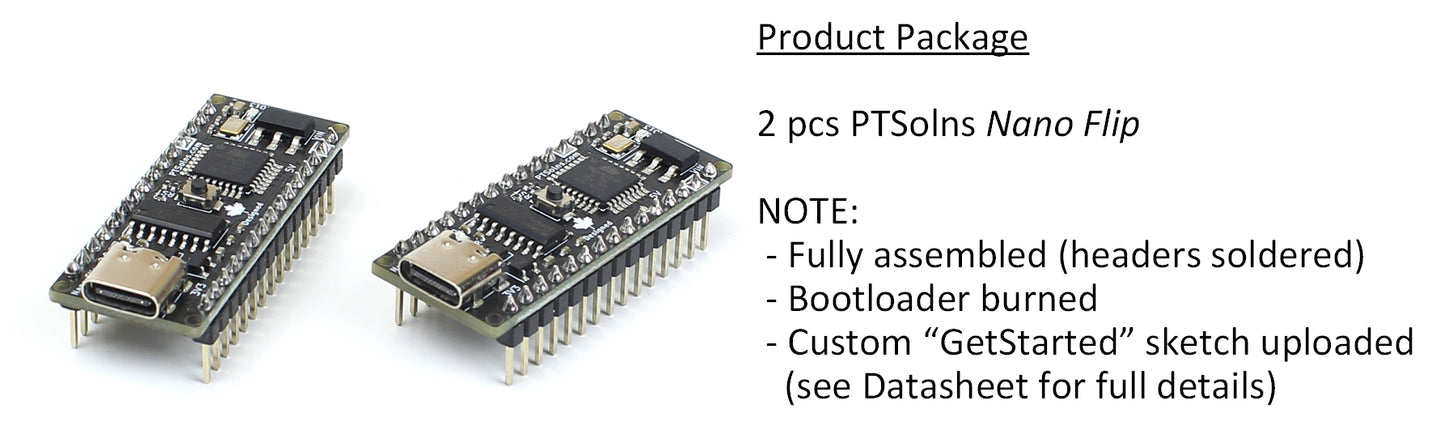
- What’s Included: Each package includes two (2) PTSolns Nano Flip boards, fully assembled and individually QC quality checked. USB cable not included. Use a USB-C cable that supports data transfer, as some cables only provide power. To program the Nano Flip using the Arduino IDE or other platforms, install the widely used CH340 USB driver (a quick, one-time setup). Detailed installation steps are provided in the datasheet.
- Customer Support & Resources: We’re here to help. Contact PTSolns support for assistance or technical questions. Every PTSolns product is backed by our comprehensive resource library, including datasheets, schematics, 3D models, Fritzing files, and tutorials. All supporting material is freely available on our “PTSolns Documentation Repository”.
Product Description

A Classic, Reimagined: The Nano Flip
The PTSolns Nano Flip is the modern twist on the classic Nano microcontroller. The popular ATmega328P microcontroller is embedded on the Nano Flip, providing all the features users come to expect. A large online community, tutorials, and support makes the Nano Flip a great choice in educational, hobby and professional settings for any project from getting started in the world of microcontrollers to rapid prototyping, and everything in between.
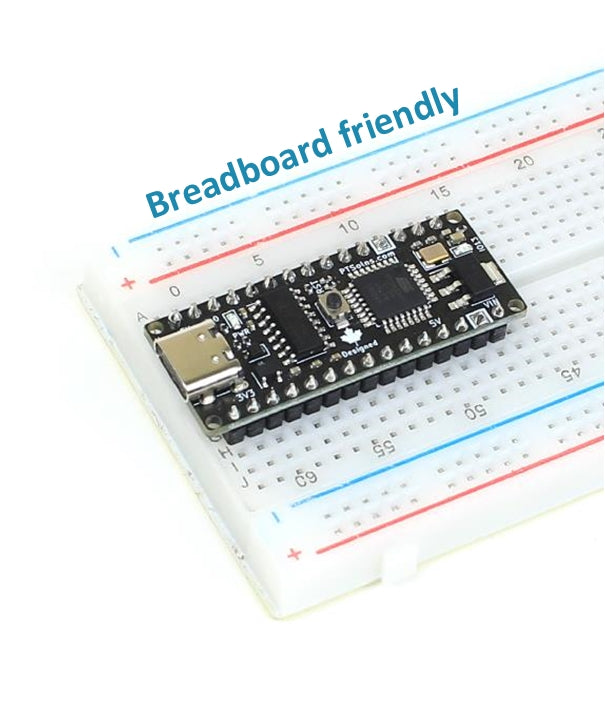
Users can program, as well as power, the Nano Flip via the industry standard USB-C Port. Alternative power options are also available. The small board footprint makes the Nano Flip a very useful board for anyone working with a standard-pitched breadboard or prototyping boards. When plugged into a breadboard, the board only takes up five rows, leaving another five available. This makes rapid prototyping and breadboard experimentation convenient and efficient.
Onboard the Nano Flip is a reset (RST) button, a power (PWR) LED, and a programmable (IO13) LED. The PWR LED can be disconnected by cutting a jumper pad on the back of the board. A secondary jumper pad on the back of the board allows the user to completely disconnect the 5V power management circuitry from the rest of the onboard components. This gives a lot of flexibility to the user, such as for example the Nano Flip can be used as a 5V power supply.
The Nano Flip comes ready-to-use out-of-the-box. Male headers are assembled onto the board and bootloader is burned. Furthermore, a custom sketch is uploaded to the board. This sketch allows the user to immediately start experimenting with the Nano Flip without any initial software installations. This “GetStarted” sketch is outlined in detail in the User Manual (on this product page).
The Nano Flip is compatible with a range of products such as the PTSolns NTEA-Series, the PTSolns Proto-N2RF, and others.
All Nano Flip boards are individually inspected and marked with a quality control sticker (either on the PCB, or on the packaging).
Features of the Nano Flip Microcontroller Development Board

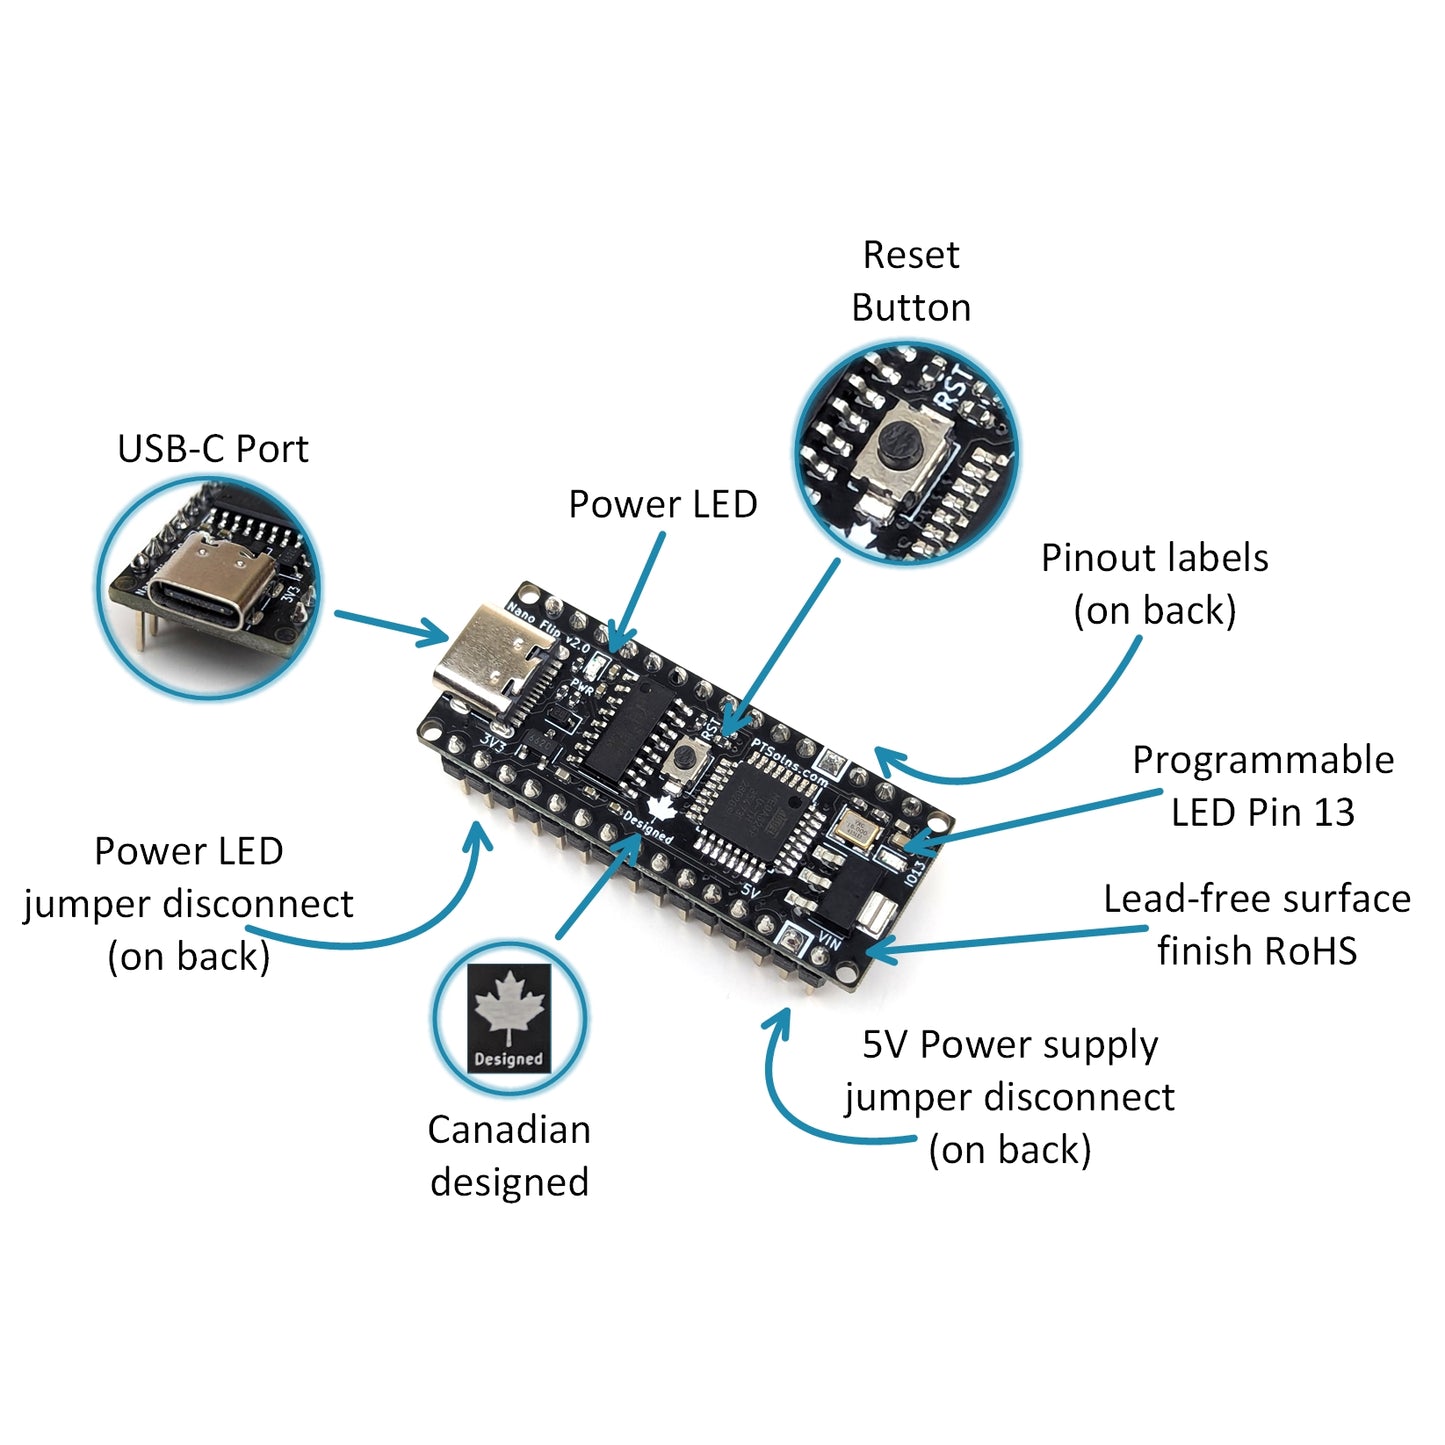
- USB-C Port.
- Power (PWR) LED. Can be disconnected by cutting the jumper pad on the back.
- Reset (RST) Button.
- Pinout labels (on the back).
- Programmable LED Pin 13.
- Lead-free surface finish RoHS.
- 5V Power supply jumper disconnect (on the back).
- Canadian designed!
Breadboard Friendly

Pinout Diagram

Ready-to-use out-of-the-box ... Fully assembled, bootloader burned, and "GetStarted" sketch uploaded!

- Fully assembled (Image with the circled "1" above): The Nano Flip is fully assembled with male headers soldered in place. With the modern USB-C Port onboard, getting started is as easy as plugging it in.
- Experiment ready: The Nano Flip has bootloader burned, and our custom "GetStarted" sketch has been uploaded.
- Test 1: Onboard LED (Pin 13) Blink Unique Pattern. Observe a blinking pattern on the onboard LED.
- Test 2: Onboard LED (Pin 13) Blink Reset Pattern. Observe a different short blinking pattern upon pressing RST.
- Test 3: I2C Scanner (Image with the circled "3" above). Connect a peripheral via I2C and automatically scan its address. View the results in Serial Monitor on baud 9600 (See NOTE below).
- Test 4: Pin 9 Fade (Image with the circled "2" above). Connect an external LED and a resistor from Pin 9 to ground and observe the classic "Fade" example.
- Test 5: Analog A0 Read. Connect a wire to the A0 Pin and observe the readout on the Serial Monitor on baud 9600 (See NOTE below).
Technical Specifications
| Input voltage on USB-C | 5 V |
| Input voltage on Vin Pin | 7-12 V |
| Current draw on a GPIO | 20 mA |
| Max current draw on all GPIOs | 200 mA (IF OPERATING in “Stable” CONDITIONS. See Datasheet for important details.) |
| Max current draw on 3.3 V pin | 160 mA (IF OPERATING in “Stable” CONDITIONS. See Datasheet for important details). |
| Max current draw on 5 V pin | 800 mA (IF OPERATING in “Stable” CONDITIONS. See Datasheet for important details.) |
| Total External Current Draw | 800 mA (IF OPERATING in “Stable” CONDITIONS. See Datasheet for important details.) |
| Microcontroller | ATmega328P, AVR 8-bit CPU, Up to 20 MHz, Flash Memory: 32 KB, SRAM: 2 KB, EEPROM: 1 KB, Peripherals I/O Pins: 23, ADC Channels: 6 ,ADC Resolution: 10-bit, PWM Channels: 6, Timers: 3 (2x 8-bit, 1x 16-bit), USART: 1, SPI: 1, I2C: 1 |
| Length | 43.18 mm |
| Width | 17.78 mm |
| Weight | 6 g |
| Material | Lead free HASL-RoHS surface finish, FR-4 base |
| Mounting Holes | 4x each with 1.651 mm diameter, 15.24 mm by 40.64 mm spacing. |
| USB-C NOTE | Please use a USB-C cable that can support data transfer. Not all USB-C cables support data transfer, and can only power a device but not program it. |
Other Names
- Nano Flip
- PTS-00196-001
- PTS-00196-101
- PTS-00196-201
Customer Reviews
Item arrived as expected and works exactly as promised. Setup was easy thanks to the documentation provided. Would highly recommend this item and PTSolns!
This board is really easy to get set up and running.
It was no problem to install the CH340 drivers for the built-in serial port and after that the Arduino IDE talked to it easily.
Both units were fully functional and passed all the testing I threw at them.
The sample program was able to detect two separate I2C devices at different addresses on the same bus and print out the correct addresses.
Light flashing, variable brightness, and 10-bit ADC input all worked as advertised.
The boards mount nicely in my test setup. They have the pins in place already. The pin labels are nicely silkscreened on the back and the important ones are marked on the top also.
The documentation is awesome and very helpful in getting started.
The board has a 7-12v DC input via the GPIO pins and can also be supplied by 5v DC through the USB-C port and there is a 5v voltage regulator on board.
The only thing I did not strictly understand is the "5v isolate" jumper disconnect, which wasn't explained very well in the manual.

I love this little Arduino-compatible board!
It's crazy to think of how far technology has come in our lifetime. I'm tech-literate but it still amazes me how inexpensive it is to get started using some very complex technology using free software and a tiny developer/experimenter board like this. It was literally 10 minutes from tearing open the package to playing with a downloaded code sample.
The build quality of this little board is great - it seems well made and works flawlessly. There are bright red LEDs that tells you your serial USB C connection is working and the device is getting power from your PC or USB hub. So the recipe to get rolling with this is:
1) Get this board!
2) Get a USB C to USB A/C cable (assuming you'll be connecting to PC, and it's not included with this board)
3) Download the current version of Arduino IDE software (totally free - Google it!)
4) Download a CH340G serial driver (the link provided by the manufacturer didn't work, but just Google "CH340G" serial driver and you'll find it - CH341SER.zip worked for me)
Install the driver and IDE (integrated development environment aka programming sandbox) and you'll be off to the races. Select "Arduino Nano" from the pulldown menu and ensure you are using the correct serial port. Then go explore code snippets and do some reading. Google "Arduino Nano projects" and the world is your oyster. This board can be plugged into SO MANY other things and used as the core of your learning universe.
Highly recommended - have fun with this thing!
These are basically Arduino Nano clones that use the USB C cable for the interface which is the most common these days. But it still requires the old ATmega 328P Bootloader. See photo.
I tested them with the Blink sketch as I'm not currently designing any new Arduino projects. They appear to work fine but I find them a bit pricey at $15 each.
I think for most people, they will be happy that they come with the headers already soldered on. For myself I prefer them not to be as I only solder on the wires I will be using and don't use the headers at all. This makes it easier to fit these boards into tighter places and keep my overall project smaller. Therefore, I'll just use these boards for prototyping only.
Because these boards use the old bootloader, I almost deducted one star. But they do what they should do so I decided that I will not penalize them for that reason. 4.5-stars would be a proper rating for these microcontroller boards.


Always love to see Canadian tech and was really happy to see this well-designed board come up. This is a fantastic ATMega 328 Arduino board for learning and projects. I love preloaded demo to give a quick function check and some basic idea of operation without any coding. Its satisfying to plug in get setup and see the board produce results over serial as a new user. I love the form factor from a learning perspective lots of pins on a standard breadboard to connect up to devices or components to help get through a learning module. Although there is great silk screening on the bottom it do love to see the pins numbered on the topside too to help with connecting up. There are enough landmarks on the board to help identify from the pin out diagram.
Documentation from PTSolns is very good, the product listing and their website and github pages are loaded with quality documentation to help you get up and running. Each of the standard devices are explained in detail. There is also a great video linked to get you started exploring the preloaded code.
But, being a regular ole Arduino you got an incredible number of resources out there to jump into your project or educational goals. While the documentation stops short of programming and flashing, there are so many tutorials out there you will have zero issues. I do recommend playing with the linked demo sketch to see what is going on and try flashing it for a risk free run. Make sure you select the "old bootloader" on the processor menu and you are all set.
Very happy with the boards and would recommend them to anyone looking to jump into Arduino programming, from first steps to final projects you are all set with these boards.


